You may be wondering what a 404 page is or why you even need one. Wonder no more! A well-designed 404 page can help reduce user frustration and provide valuable information about how to navigate the site better. It also allows you to be creative in retaining a user on your website and directing them from a broken page to a working page. Continue reading to find out how to set up your custom 404 page in WordPress and just how easy it is.
Why Create a Custom 404 Page?
Any website that wants to improve user experience and keep visitors who have reached a broken link should have a personalised 404 page. Users may find the default WordPress 404 page uninspiring because it is plain and offers no more information. You can enhance user interaction and lower bounce rates by designing a unique 404 page.
As crucial as having a person land on a functional website is ensuring that they have a nice experience on the 404 page. Resist the temptation to use your homepage as the 404 error instance link – use a custom 404 page instead. The user may not realise they were on the wrong page due to this as they still wind up there, which can be confusing.
A custom 404 page eliminates confusion, tells the user where to go next and retains the interest in your brand.
Setting Up A Custom 404 Page
WordPress themes can enable the use of custom 404 pages in a number of ways. Plugins and WordPress go hand-in-hand and even exist to make this process easier. Should you choose to do it without a plugin, this is possible with editing the php files. Here are the options you have:
Classic Themes Using Block Editors
Option 1: Use A Theme’s 404.php
Editing PHP files on your website can be tricky. However, do not feel intimidated as it is relatively easy. Many classic themes include a template for a 404 page.
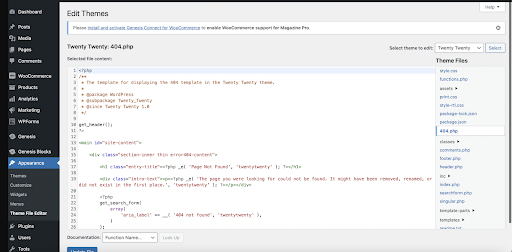
- You will need to navigate to Appearance > Theme File Editor from your WordPress dashboard after logging in.
- With multiple themes installed, only select one theme for editing. Subsequently, find the 404.php file of the selected theme.
- The 404.php file will have to be copied to the child theme thereafter.
- You can now start editing the page with text or visual elements you want displayed on the page for the user to see.
- Once you’re satisfied and have completed your edits, click “Update File” to save your changes. Make sure to view the changes after editing to ensure the changes are reflecting correctly.
Option 2: Copy A 404.php File
A 404.php file might not be present in some WordPress themes. If so, you can transfer the 404.php file from another theme if it has one.

Source: Twenty Twenty theme 404.php file
You can edit the 404.php file and save it in your theme folder, though it may require some tweaking to match your theme.
- You should find a theme with a 404 page that you would like to use.
- The next step is to navigate into the theme folder of the chosen theme and make a copy of the 404.php file.
- After this, moving it into their site’s active theme or child-theme folder is essential, making sure it is named ‘404.php’.
- It is important that you check how the new 404 page looks on your website’s front-end in order to ensure everything appears as expected.
- Finally, changes can be made by using the Theme File Editor and hitting Update File when done so that all alterations are saved correctly.
Option 3: Copy The Index.php File
Is your theme missing a 404.php file? We’ve got the answer to creating one!
- The first step is to duplicate the index.php file.
- The second step requires renaming the duplicate 404.php.
- Thirdly, code used for displaying posts must be removed from the file.
- Fourthly, add the text and media elements you want to make your page stand out and unique .
- Finally, clicking Update File will save all changes made in this process.
The 404 page will match your current theme with this option, so it is a little cleaner than utilising a 404 page from a separate theme. However, you will need some knowledge of PHP and HTML if you will be using these options.
Using A Page Builder To Create The 404 Page
If you’re using a WordPress page builder like Elementor, Divi, Beaver Builder, or Oxygen, you can add a 404 page from the builder’s interface.
For additional information on how to modify the settings to direct any incorrect URLs to your own 404 page, refer to the instructions for your favourite builder.
Use A 404 Page WordPress Plugin
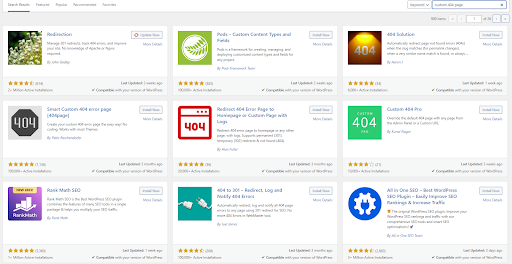
Plugins are a quick and easy way for those without technical knowledge or looking for an easy way to create a custom 404 page.
Source: WordPress plugin registry
Though many WordPress plugins exist, there are some that work better than others. What is important is to find a plugin that is compatible with your theme. Additionally, look at the reviews of top rated plugins to find the ideal one.
There may be a stage of trial-and-error to test and see which plugin will be best. Many plugins also offer basic capabilities that come free with installation and more premium features that are generally part of a paid tier.
Site-Wide Editing
WordPress has many themes that offer the option of site-wide editing, effectively known as WordPress Full-Site Editing. With these themes, you’re able to use a visual editor for making changes, including a custom 404 page. Use the following steps below.
- You will need to navigate to Appearance > Theme File Editor from your WordPress dashboard after logging in.
- Under Editor, select Templates and then choose the 404 template.
- Use the block editor to create a custom 404 page and hit Save twice – once for changes made in editor and again for saving of template.
Conclusion
You can now see the advantages of a custom 404 page and why you need one. Instead of having the user land on a dead page, engage them with your custom 404 that can be as creative and specific as you want it to be. Maximise this opportunity and keep the user on site.


